
To collect the clay
The clay is dug up from the ground and laid out. When excavating, the clay bed is visible as a pit with a rounded profile and clayey sides, soft, flat, smooth, and ‘fatty’ to the touch (if the wall is damp). The clay is dug up late in the summer when the ground is a dry as possible and the clay and earth are not soaked with water (which makes the work much harder). After this, the clay is put in a pit dug into the earth. The clay lies spread out 10-20 cm thick. It will be weathered by staying outside and freezing in the winter: this causes every clay particle to separate from the other particles. The clay is maturing.

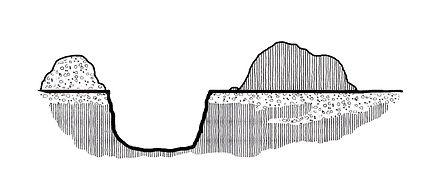
Weathering the Clay season I
The clay lies spread out 10-20 cm thick. It will be weathered by staying outside and freezing in the winter: this causes every clay particle to separate from the other particles. Sometimes the bottom of the pit can be lined with stones, or if possible the pit is dug in a sandy place near the work place. In order to hold a ton or so of clay, the very shallow pit should be about 2-5 m long and 1-2 m wide. This continuing process now infuses/mixes the clay with water from the autumn rains. When the frost comes and the clay is frozen during the winter months, the clay particles make the prescribed change and when the warmth of spring dries up all excess water, the clay is ‘weathered’. In warm climates, the same proce- dure is made by drying it in the sun. The warmth causes the individual particles to separate from each other in the same way, and also results in a weathering of the clay. This process is a speeded-up natural one which the prehistoric artisan understood and used.

Preparing the Basic Clay body
The weathered clay in the spring is crumbly, which means that mixing in the basic temper is the next step in the process. Half of the clay is dug up and placed next to carefully chosen sand which was gathered and is now spread out in a layer over the clay that was left in the pit. The clay should be about 1/5 the volume of the clay, or a 20% sand mixture: this can vary somewhat depending the natural amount of sand in the clay. The dug-up half of the clay is put back and spread over the sand.

Mixing the clay
After this, the clay is mixed with the sand by treading on it and/or stamping it with a club or similar tool to obtain as homogenised a mass as possible.

Maturing the clay
The clay is smoothed and allowed to rest for several weeks. It is protecting from rain or drying out with boards or mats woven from reeds. Before it is divided up into suitable parcels for storing, it is tested by rolling out a coil and making a knot. The clay should be plastic but not too ‘fat’—if it is, more sand can be added. This test (Hamer 2004:387) is made throug- hout the tempering process described below. If the clay is ‘short’, the knot breaks before it can be completed.

Dividing and Storing the clay
The next step is to divide the basic clay into suitable carrying and storing bits. Several houses (or the artisans belonging to the house) can take their shares and store them in a temperature-controlled (to avoid frost and moisture) cellar pit as in building 172 at Pryssgården (see. Köpingebro house 4 Tesch 1993:165) or stored in shallow clay holes in the workshop—(see. Köpingebro 4 Tesch 1993:138). The clay parcel can be wrapped up in cloth which is sprinkled regularly with water in the cellar pit. If the clay dries out or freezes, the whole procedure must be redone from the beginning.
Preparing Clay for Special Purposes
The clay parcels are plucked up when needed and mixed with a temper suitable for the function of the vessels. For large vessels it can be a very coarse temper with small pieces of brittle stone up to 1 cm in diameter. This extremely coarse temper is good for pots which must tolerate great changes in temperature but can also be a choice for making big vessels. For medium coarse, smaller pots for cooking, one sees often a considera- bly more sandy consistency for the brittle stone that is ground down with a grinding stone Sometimes the artisan chooses to add crushed, already- fired clay (chamotte) in the clay to be used for small and medium-sized vessels.
Mixing with chamotte 10–20%
Mixing with additional fine sand (often from the mouth of the stream or the beach) up to 40%. Different kinds of temper can also be mixed with each other to achieve for example very tolerant technical ceramics. The choices of temper are one of the parameters than can be tracked over time: different artisans can have different backgrounds and thus choose very different tempers. In these cases, even though the mineral content of the clay in the ceramics does not differ from the local clays, one should be able to trace an unusual technical craft knowledge which most likely means that certain vessels were made in a non-local tradition
Clay Ready for Forming
The processed clay is often put aside for a day to allow an even spread of moisture in the tempered, finished clay parcel. This parcel is then divided into several pieces which are kneaded according to needs and pinched or built up with the ‘paddle and anvil’ method (Hamer 2004:116 and 251).

Paddle and Anvil
This method is based on a pinched (Hamer 2004:264–265) low form designed to be the bottom with the right diameter. Thick coils of clay are laid on it and pushed down and then beaten with the paddle and anvil. It is important that the newly kneaded lump is placed one end (as shown in the fig.).
And is then beaten out to a slab and after that, pushed down to a low wide form with a well formed curve between the bottom and the sides to make it strong enough for handeling in the differenst steps in the manufactur- ing, drying and firing pricesses. A wellformed curve is important to make strong fired pots that will last for years in domestic use. The description in the example is the size of a cooking pot with a flat bottom and a thickness of 1 cm or slightly less. The low form is dried almost leather-hard.

Forming the sides
The next step is to build up the sides. Rolls are rolled on a flat surface in
the direction that the kneaded lump had so that the clay particles lie in a spiral form going in the ‘right’ direction—otherwise, it is difficult to get a roll that is even and equally thick to build up the wall with.
The roll is attached by the edge that has been roughened up especially for this purpose, allowing a greater fastening surface and can be made in a variety of ways. Each roll is attached separately and the clay is cut at a 45° angle on the ends for better attachment (this angle makes longer areas for fastening the clay coil in itselt). Then the sides are pressed and beaten up until the walls have the right thickness. Each coil must dry enough to hold up the next one without collapsing. The time needed to finish the vessels depends on the weather and the humidity in the air: also, working in direct sunshine, wind or rain is not good, either. Each ring is kneaded and rolled and applied before doing the next— otherwise the roll will break when it is bent (it starts to dry and stiffen immediately) and the joint will be more delicate if repeated repairs are made (more likely to break in drying and firing). An experienced artisan who is familiar with the technique can build three to five vessels at the same time in a tempe- rature of around 20°: there is just the right time between steps and the artisan can work in a rhythm, gaining momentum. When the vessel is of the intended size, it is smoothed and then finished according to the tradition that the artisan and her/his group works in. Finishing techniques and decoration and firing techniques differs between ceramic cultures.

Paddle and anvil technique and lerning from a ceramist. There are many traces in the archeological record for children with advanced knowledge in specific parts of the ceramic craft.
Glossary
Glossary/definitions in ceramic crafting: These definitions are often of a comparative nature—one compares the various conditions of the material with other materials in order to describe the condition of the clay. The glossary is based on the expressions that are used in my own practice- based knowledge; in those cases where I explain concepts with the help of literature, there are references. There are a large amount of different expressions in descriptions in the world of crafts, but I choose here those which are used in this work.
Bon-firing: The dried objects are fired with the help of fires fuelled by organic material like wood, sod or manure directly on the ground.
Bone hard: Clay which is the last stage of possible working—it is ‘hard as bone’, which means that the surface can be burnished to a high shine, cut or etched into with very thin and exact decorations wit- hout the surface chipping or splintering, decorated by punching in with an instrument.
Burnishing: A traditional method for making a surface shiny and dense which makes the clay less porous after firing. In certain cultures it is used to make a pattern of matte and shiny ornamentation on the surface. Burnishing is done when the clay is bone hard.
Chamotte: Word to denote a clay temper made from crushed, already fired ceramic sherds.
Filler and packing material: Different kinds of material which are used as fillers and protectors in a ceramic kiln. The kiln is prepared for the firing by putting this material under and around the unfired vessels. They create a safe environment for the vessels. Nowadays the term is most often used for platforms or plates made specially for this purpose of inflammable material which protects the objects from each other or parts of the oven, which can be as much as 1300 °C. In outdoor firing, in pits and more simple kilns, large ce- ramic sherds are used to protect the newly-made objects from wood thrown on top of them or from getting damp from the ground.
Firing: Different heating methods to cause the clay to change to ceramics which means that the temperature must be at least 500 °C (932 °F). When the clay can no longer return to a formable material, it has become ceramics (Lindahl et al. 2002:30).
Leather hard: A leather-hard clay is no longer soft—it is sturdy and can be changed in form up to a certain point. It got its name because when you stroked the surface of the vessel it reminded you of lea- ther—hard but pliable at the same time.
Oxidation: Total access to oxygen. In this connection both ‘oxidation’ and ‘reduction’ are connected to ceramic firing techniques. A simplifica- tion can describe the differences between these techniques: an oxi- dising firing is made with good access to oxygen, and the ceramics does not turn black or gray (think of brick, for example)—instead the natural color of an iron-rich natural clay is orange-red when fired. An open bonfire or a pit-fire is often an oxidation firing.
Paddle and Anvil: Is a hand technique which is often used when building larger ceramic vessels. The kneaded clay is rolled out in long rolls which are then put on top of each other and joined to each other. Used often in combination with pinching.
Pinching: Pinching is a hand technique that means that one takes a piece of kneaded clay from a clay mound or a lump and sets one’s thumb in the middle, slowly stretching out and forming the clay until by rotating it by hand one creates the underpart of a vessel, its base or bottom.
Pit firing: A firing similar to an bonfire firing but occurring in a pit. This type of firing is more controlled than open-air firing. Sometimes the pits are covered over with organic material after firing so that the vessels cool more slowly, a method which brings out the red- grey-black surface that is so characteristic of pit-fired objects.
Reduction: Limited access to oxygen while firing or cooling—in this con- nection the iron in the clay (Fe2O3) reacts by returning to the black or grey tones (depending on the degree of oxygen insuffi- ciency) that iron has when it is not oxidised. Reduced iron has lost oxygen atoms, which occurs when the lack of oxygen ‘takes’ the good three (O3) oxygen atoms and only reduced iron gives colour to the fired wares. This lack of oxygen is achieved either consciously (black ware) or accidently on undersides of vessels where flamma- ble material was still there when the vessels were cooling.
Reoxidation: When the artisan fires in pits or open flames that are covered with flammable material, s/he is often conscioulsly ‘reducing’ the ware while it cools. If the ware is taken up too early or the flamma- ble material gets overheated and starts to burn, the reduction (crea- ting an oxygen-free atmosphere) disappears entirely or in part. If it vanishes in part, the effect can still be seen as a grey stripe in the middle of the ware. Normally the reduction disappears completely and the ware returns to a brick red colour throughout the fabric. Reoxidation can also occur when someone uses everyday ceramics which were originally black and puts them into an open fire: the high temperature and presence of oxygen returns FeO to Fe2O3.
Smoothing: Smoothing is a polishing technique which is used mostly on the inside of the vessel in order to scrape away excess and end up with a perfect inside. It is used on both storage vessels and thin ceramics.
Soft clay: A soft clay is completely formable and plastic. It is saturated and is somewhat damp; it should not be ‘loose’ or ‘hard’, however— one should be able to freely shape it.
Sooting: A simple technique for making ceramic goods totally black and shiny. One can either ‘grill’ the object above an open fire so it gets covered in soot, or throw it hot in a pit with straw (bigger vessels can be covered with flammable material which it begins to glow, leaving soot on the vessel surface) and then polish it with bee’s wax until the surface is compact and and black. In addition to the de- sirable surface treatment, sooting also has a practical function—it makes the vessel impermeable so that the porous, unglazed ware does not lose as much moisture.